BIMLibrary.co
Understanding .PAT Files and Fill Patterns in Revit, How to Create and Use
In the world of architectural design, precision and detail matter. Fill patterns, often used to represent various materials like bricks, tiles, or pavers, are crucial in giving a clear visual identity to surfaces in 2D and 3D views. If you’ve worked with Revit, you’ve likely encountered fill patterns controlled through .pat files. This blog post will explore what .pat files are, their role in Revit, and how to create and use them to enhance your design workflow.
What is a .PAT File?
A .pat file is a text-based format that defines custom hatch or fill patterns in design software like Autodesk AutoCAD and Revit. Each pattern is defined by angles, line spacing, and offsets that create repetitive shapes, such as squares, bricks, or hexagons, which are applied to surfaces or materials.
In Revit, these patterns represent materials and finishes in both model and drafting views. A .pat file allows users to customize these patterns beyond the default options, adding flexibility to the design process.
Where to download .PAT files for fill patterns in Revit.
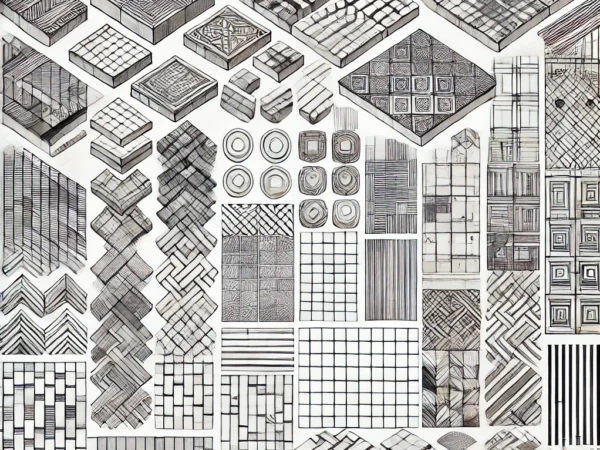
BIMlibrary.co offers a wide variety of Revit fill patterns and .PAT files available for free download. The site provides a comprehensive collection of patterns, including tiles, bricks, pavers, steel, concrete, grass, and other materials. It is an excellent resource for Revit users looking to enhance their designs. With frequent updates and a user-friendly interface, BIMlibrary.co is a go-to platform for architects and designers who want to fill patterns without creating them from scratch.
Types of Fill Patterns in Revit
Revit organizes fill patterns into two main categories:
- Drafting Patterns:
- These are view-specific and scale according to the view’s zoom level.
- Typically used for details or annotation views, such as floor plans or section views.
- Example: A brick wall hatch pattern that scales with the drawing in a 2D plan or detail view.
- Model Patterns:
- These patterns are real-world size-based and maintain their scale in 3D views and all design drawings.
- Model patterns help represent actual materials, such as tiles, bricks, or stone cladding, that have a physical size relationship to the model.
- Example: Floor tiles must maintain their specific size and alignment regardless of the view scale.
How to Use Fill Patterns in Revit
Revit’s flexibility allows users to apply fill patterns to a variety of design elements, including walls, floors, and materials. Here’s a step-by-step guide to using them:
Loading a .PAT File into Revit
Revit supports custom-fill patterns through .pat files. Here’s how to load and use a custom pattern:
- Open Revit and Load a Project.
- Go to the Manage tab on the ribbon and select Additional Settings → Fill Patterns.
- In the Fill Patterns dialog box, click New.
- Choose either Drafting or Model, depending on your project needs.
- Select Custom and then click Import.
- Browse to the
.patfile you want to use and click Open. - Assign a name to the pattern and adjust the import scale if necessary.
You can now apply this pattern to various elements, such as walls, floors, or roofs, by assigning it as a Surface Pattern or Cut Pattern in the material settings.
Applying Fill Patterns to Elements
Once the pattern is loaded, follow these steps to apply it to specific elements:
- Select the element (wall, floor, or ceiling) you want to apply the pattern to.
- In the Properties palette, scroll to Surface Pattern or Cut Pattern.
- Select the newly loaded pattern from the dropdown list.
Creating Custom Fill Patterns for Revit
Creating a custom .pat file for Revit allows you to define patterns that suit your project’s unique needs. You can either modify an existing pattern or write one from scratch.
Structure of a .PAT File
A .pat file is essentially a text file that follows a specific format:
- Header: This defines the pattern name and its description.plaintextCopy code
*Custom_Pattern, Example of custom tile pattern ;%TYPE=MODEL - Pattern Definitions: These lines define the angles, spacing, and offsets that create the pattern.plaintextCopy code
0, 0,0, 1,0, 1,0 90, 0,0, 0,1, 0,1Each line consists of:- Angle: The direction of the lines in the pattern (e.g., 0 degrees for horizontal).
- Origin Point (X, Y): Starting point of the line.
- Delta X and Delta Y: The displacement between the lines, defining how frequently the pattern repeats.
Steps to Create a Custom Pattern
- Open a Text Editor: You can use any text editor like Notepad or Notepad++.
- Define the Pattern: Write the header and the pattern definitions. Start with simpler patterns, such as parallel lines or grids, and then experiment with more complex shapes like octagons or herringbone.
- Save the File: Save your file with the
.patextension. - Test and Adjust: Import the pattern into Revit and check how it looks in your model. If necessary, adjust the pattern definition in the
.patfile to get the right look.
Here’s an example of a custom pattern that alternates between octagons and squares (source: RevitCity.com):
*octogon and square pavers
;%TYPE=MODEL
45.0000, 0.400,0.400, 0.707107,0.707107, 0.141421,-1.272792
180.0000, 0.400,0.400, 1.000,1.000, 0.400000,-0.600
270.0000, 0.400,0.400, 1.000,1.000, 0.400000,-0.600
0.0000, 0.500,0.500, 1.000,1.000, 0.400000,-0.600
315.0000, 0.900,0.500, -0.707107,0.707107, 0.141421,-1.272792
90.0000, 0.500,0.500, 1.000,1.000, 0.400000,-0.600
135.0000, 0.500,0.900, 0.707107,0.707107, 0.141421,-1.272792
0.0000, 0.500,0.900, 1.000,1.000, 0.400000,-0.600
45.0000, 0.900,0.900, 0.707107,0.707107, 0.141421,-1.272792
270.0000, 0.900,0.900, 1.000,1.000, 0.400000,-0.600
270.0000, 1.000,0.400, 1.000,1.000, 0.400000,-0.600
180.0000, 0.400,1.000, 1.000,1.000, 0.400000,-0.600
This file creates a repeating pattern of octagons interlocked with squares, perfect for floor or wall tiling.
Tips for Creating and Using Fill Patterns
- Scale is Important: For model-based patterns, ensure the scale matches the real-world size of the materials you represent. Adjust the scale to make the pattern clear in detailed views for drafting patterns.
- Test Regularly: After modifying or creating a new
.patfile, test it in Revit to ensure the pattern behaves as expected. Simple mistakes in the.patfile, such as incorrect spacing or angles, can result in patterns not displaying correctly. - Use for Visual Impact: Fill patterns aren’t just functional—they can dramatically enhance the visual clarity of your drawings, helping clients and contractors better understand material layouts.
Conclusion
Understanding and utilizing .pat files and fill patterns in Revit can significantly enhance your designs’ aesthetics and clarity. Whether you’re applying standard patterns or creating custom ones, these tools allow for better material representation and greater flexibility in architectural documentation.
By learning how to work with custom .pat files and applying them efficiently, you can take your Revit projects to the next level with highly detailed and accurate material finishes. Whether you’re representing brick walls, tile floors, or complex paver layouts, fill patterns are an essential aspect of your design toolkit.