BIMLibrary.co
What Is a Section Drawing? Section Drawings Explained

In a very technical description, a section drawing, also known as a section or sectional drawing, is a type of technical drawing that shows a view of an object as if it were cut through along a plane. This allows you to see the interior details and relationships between different object parts that would not be visible in a standard view.
As a child, I was endlessly fascinated by looking inside things—peeling back the outer layers to uncover the secrets within. I would gaze in awe at the pages of books that showed cross-sections of ships, castles, miniature houses, complex buildings, or even the earth itself. The idea that something so solid and complete on the outside could hold an entire world of complexity on the inside sparked my imagination. I’d draw my little section views of houses, dreaming up hidden rooms and tunnels no one else could see. Now, as an adult, that same wonder has only deepened. The beauty of a section drawing lies in its ability to reveal the unseen and tell stories of construction, design, and purpose. It’s like holding the key to the mysteries within, a reminder of that childhood curiosity that still drives me to explore how things work and how they come together.
As a side note, a plan is a type of section, though it might feel more familiar because it represents a horizontal cut through a building, typically taken at about waist or chest height. This horizontal slice reveals the layout of spaces, walls, doors, and windows as viewed from above, making it an essential tool for understanding how rooms and pathways are organized. However, what differentiates a plan from other section drawings is the orientation of the cut. While a plan shows a horizontal section, other section drawings typically depict a vertical cut, exposing the height, depth, and structural relationships within a building. Both types of sections serve as tools for visualizing parts of a design that are hidden, but their perspectives and purposes vary, complementing each other in providing a complete understanding of the structure.
Who is using section drawings?
Professionals use Section Drawings in various fields where visualizing internal structures or layouts is essential. Here’s a breakdown of the key groups who rely on section drawings:
Architects
Architects use section drawings to study and illustrate building interiors, such as walls, floors, ceilings, staircases, and construction details. The section drawings show spatial relationships, different building elements, and material assembly within a design solution. The sections help communicate the architectural, structural, and mechanical to the builders and clients.
Engineers
Civil Engineers detail construction elements in drawing sections for infrastructure projects like bridges, dams, or roadways. Mechanical Engineers represent internal mechanisms of machinery or systems, like gears, pipes, or engines. Structural Engineers analyze and design load-bearing elements.
Interior Designers
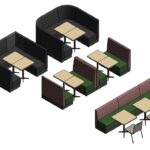
Interior designers use sections to present detailed layouts of room designs, including furniture placement, furniture section, and finishes.
Contractors and Builders
Contractors and builders use section drawings to understand how to construct, assemble or install a building or project’s parts and identify dimensions, materials, and relationships between components.
Industrial Designers
Industrial and product designers use sections to develop products by showing internal structures, materials, and assembly details.
Urban Planners
Urban planners use large sections to visualize grade elevations and cross-sections of landscapes, roads, or urban layouts.
Students and Educators
Students and Educators in architecture, engineering, and design courses to learn how to communicate ideas effectively through section views.
Medical and Biological Professionals
Surgeons and Medical Illustrators use drawings To study cross-sections of the human body or organs. Biologists analyze sections of plants or organisms under a microscope.
Key Features of a Section Drawing
Cutting Plane
Represents the imaginary line or plane along which the object or structure is “cut.” It’s typically shown on a related plan or elevation as a dashed line with arrows indicating the direction of the view.
Reveal Interior Details
It exposes internal elements such as walls, floors, ceilings, beams, pipes, or mechanical components that are hidden in standard exterior views.
Material Indications
Uses hatching, shading, or textures to represent different materials (e.g., concrete, wood, steel) for clarity and precision.
Annotations and Labels
Includes written notes, dimensions, or symbols to clarify components, materials, and measurements, ensuring the drawing is easily interpretable.
Structural and Spatial Relationships
Shows the relative positioning and connections between elements like walls, floors, columns, and openings, aiding in understanding how they work together.
Scale and Proportion
Drawn to scale, ensuring an accurate representation of sizes and relationships between different elements for use in construction or analysis.
Contextual Elements
Sometimes, it includes parts of adjacent spaces or features (such as neighboring rooms, outdoor areas, or the surrounding environment) to provide context.
Perspective
Provides a vertical or horizontal cross-section to illustrate the internal depth and layers of a building or object, offering insights into its construction and function.
Advantages of using section drawings
Section drawings offer clarity by providing a detailed view of an object’s interior, making its construction and function more straightforward to understand. They enhance visualization, allowing viewers to grasp the relationships between different parts of an object. Additionally, they serve as an essential tool for communication, effectively conveying design intent and technical information to others precisely and comprehensively.
Creating Section Drawings
As mentioned above, creating section drawings is a fundamental skill in architecture, engineering, and design that brings hidden details to light. These drawings offer a unique perspective by slicing through a structure or object to reveal its internal layout, materials, and relationships. Here is a brief overview of how to do it:
- Define the Cutting Plane Clearly
- Indicate the cutting plane on related drawings (e.g., plans or elevations) using a bold dashed or center types line with arrows showing the direction of the view. Label the plane (e.g., A-A, B-B, or 1-1, 2-2) for easy reference.
- In most advanced designs, the section label also indicates the drawing number where the section detail is located.
- Consistency in Line Types
- Use thick, dark lines to show the edges of the cut section.
- Thin, light lines should represent elements behind the cutting plane that are visible but not cut through.
- Hatching for Materials
- Use standard hatching or shading patterns to represent different materials (e.g., concrete, brick, wood). Be consistent with the hatching style throughout the drawing.
- Omit Hidden Details
- Hidden or unnecessary details behind the cutting plane should typically be excluded unless they are essential for understanding the design.
- Add Clear Annotations
- Label important components, materials, and dimensions to ensure clarity. Annotations should be legible and placed neatly to avoid overlapping.
- Respect Proportion and Scale
- Ensure the section drawing is drawn to the correct scale so that measurements and spatial relationships are accurate.
- Show Relevant Details Only
- Include only the necessary details to convey the design or function effectively. Overcrowding the drawing with too many elements can lead to confusion.
- Include Context When Necessary
- Adjacent spaces or surrounding areas should be added when relevant to provide context for how the section fits into the larger design.
- Use Section Symbols and Keys
- Add a legend or key to explain hatching, line types, or symbols used in the drawing.
- Maintain Orientation Consistency
- Ensure the direction of the section view matches other related drawings for clarity and ease of understanding.
How to Produce a Section Drawing
Creating a section drawing can be done using various methods, ranging from traditional hand drafting to advanced CAD and 3D modeling software. Here’s a guide to the main approaches:
1. Hand Drafting
This traditional method requires manual drawing skills and a strong understanding of design and technical drafting principles.
- Tools Needed:
- Drafting board, T-square, triangle, and scale ruler.
- Pencils, erasers, and technical pens.
- Hatching templates or stencils for material indications.
- Steps:
- Determine the cutting plane on a related plan or elevation.
- Use a scale ruler to draw the section at the desired scale.
- Add thick lines for the cut surfaces and lighter lines for background details.
- Apply hatching or shading to indicate materials.
- Annotate dimensions and labels clearly.
2. CAD Software
Computer-aided design (CAD) tools like AutoCAD are widely used for precise and efficient 2D drafting. Drafting a section drawing in CAD uses the same methods used for manual drafting. All reference plans need to be in close proximity to use the guidelines for section construction.
- Steps:
- Import the plan or 3D model into the software.
- Define the cutting plane using CAD tools.
- Determine the size and section drawing location.
- Use guidelines
- Use line weights and layers to distinguish cut surfaces, visible details, and hatching.
- Add annotations, dimensions, and symbols.
- Export or print the section drawing for further use.
- Advantages:
- High precision and accuracy.
- Easy modifications and duplication.
How to Produce a Section Drawing
Creating a section drawing can be done using various methods, ranging from traditional hand drafting to advanced CAD and 3D modeling software. Here’s a guide to the main approaches:
1. Hand Drafting
This traditional method requires manual drawing skills and a strong understanding of design and technical drafting principles.
- Tools Needed:
- Drafting board, T-square, triangle, and scale ruler.
- Pencils, erasers, and technical pens.
- Hatching templates or stencils for material indications.
- Steps:
- Determine the cutting plane on a related plan or elevation.
- Use a scale ruler to draw the section at the desired scale.
- Add thick lines for the cut surfaces and lighter lines for background details.
- Apply hatching or shading to indicate materials.
- Annotate dimensions and labels clearly.
2. CAD Software
Computer-aided design (CAD) tools like AutoCAD are widely used for precise and efficient 2D drafting.
- Steps:
- Import the plan or 3D model into the software.
- Define the cutting plane using CAD tools.
- Use line weights and layers to distinguish cut surfaces, visible details, and hatching.
- Add annotations, dimensions, and symbols.
- Export or print the section drawing for further use.
- Advantages:
- High precision and accuracy.
- Easy modifications and duplication.
3. BIM Software (e.g., Revit, ArchiCAD)
Building Information Modeling (BIM) tools allow you to create detailed 3D models and extract section drawings directly from the model. That helps to visualize other objects inside the building, such as families in Revit software.
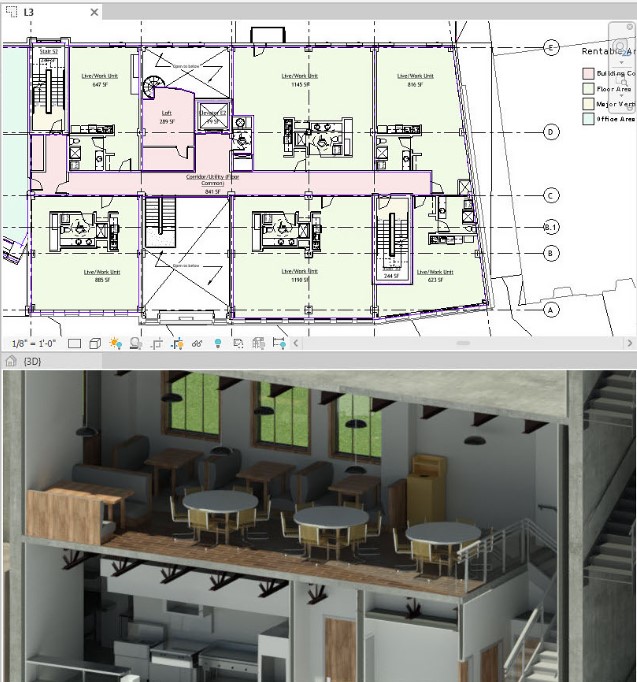
- Steps:
- Create a 3D model of the building or object.
- Use the section tool to define the cutting plane in the desired location.
- The software will automatically generate the section with accurate materials, layers, and relationships.
- Add labels, dimensions, and annotations for clarity.
- Advantages:
- Automatically updates sections when the model changes.
- Provides detailed visualization and material representation.
- Enhances collaboration among team members.
4. Other Software (e.g., SketchUp, Rhino)
Programs like SketchUp or Rhino are great for quick, flexible modeling and sectioning.
Steps:
- Build a 3D model.
- Use section tools or plugins to slice the model at the desired plane.
- Export the section as a 2D drawing or incorporate it into a presentation.
Advantages:
- Quick and intuitive modeling.
- Great for early conceptual designs.
Conclusion: Celebrating the Beauty of Section Drawing
Section drawings are more than technical tools—they are artistic and intellectual gateways into the inner workings of buildings, structures, machines, and even life itself. They unlock a hidden world, revealing complexities that often go unnoticed, and transform the mundane into something extraordinary. Whether you’re an architect showcasing spatial relationships, an engineer analyzing structural integrity, a product designer, or a curious student exploring the unknown, section drawings are a universal language bridging imagination and reality.
At their core, section drawings remind us of the beauty in understanding how things come together. They encourage us to peel back the layers, ask questions, and marvel at the intricate designs that shape our world. From the childhood wonder of uncovering hidden details to the professional satisfaction of solving complex challenges, section drawings are a timeless celebration of curiosity, creativity, and craftsmanship.